|
Setting up an email account in Outlook Express
(To see how to edit an existing address see the next section).
Select "Accounts" from the "Tools" menu as shown below.

A window like the one below will appear (it may already have some details in the main space but you shouldn't need to worry about these).
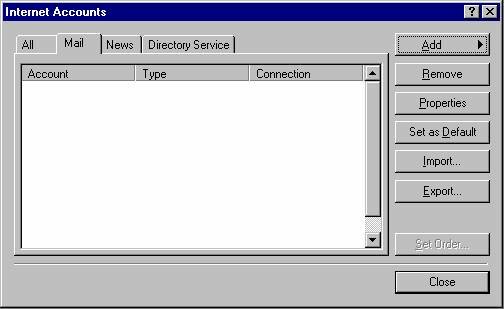
Click the "Add" button the menu shown below will appear - select the "Mail" option.

Follow through the screens below entering your details and click the "Next" button. It will initially be greyed out on each screen until you have entered some information.

Your "Display Name" is your actual name.
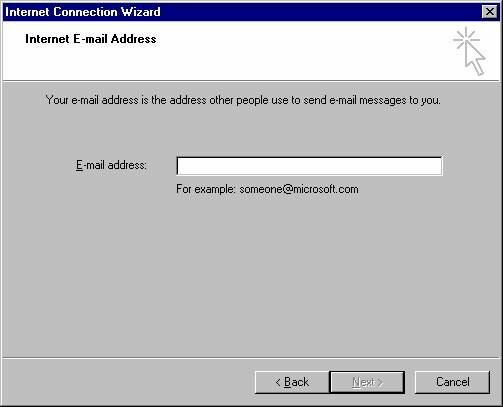
Your "Email Address" is the email address you want people to reply to.
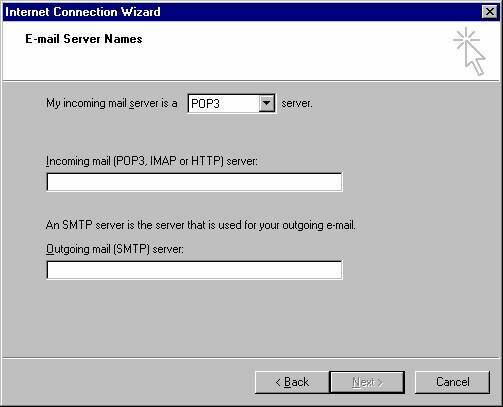
Normally you would select "POP3" from the drop down box.
Enter the "Incoming Mail Server" details - common email servers are as follows:
|
Provider
|
Incoming
|
Outgoing
|
|
WEBENZ
|
jupiter.webenz.net
|
use your ISP
|
|
XTRA
|
pop3.xtra.co.nz
|
smtp.xtra.co.nz
|
|
Clear
|
pop.clear.net.nz
|
smtp.clear.net.nz
|
|
IHUG
|
pop.ihug.co.nz
|
smtp.ihug.co.nz
|
|
Maxnet
|
pop3.maxnet.co.nz
|
smtp.maxnet.co.nz
|
|
Quik Internet
|
mail.quik.co.nz
|
mail.quik.co.nz
|
|
Paradise
|
pop3.paradise.net.nz
|
smtp.paradise.net.nz
|
|
Web Internet
|
mail.win.co.nz
|
mail.win.co.nz
|
|
Iprolink
|
pop.iprolink.co.nz
|
smtp.iprolink.co.nz
|
|
Actrix
|
pop.actrix.co.nz
|
mail.actrix.co.nz
|
|
Voyager
|
pop3.voyager.co.nz
|
smtp.voyager.co.nz
|
|
WebFarm
|
your domain name eg mydomain.com
|
your domain name eg mydomain.com
|
|
ZIP Internet
|
pop3.zip.co.nz
|
smtp.zip.co.nz
|


You are now finished! Click the "Finish" button to save your new account.
Modifying an existing account in Outlook Express
Select "Accounts" from the "Tools" menu as shown below.
A window like the one below will appear with a list of email accounts. If the "Mail" tab is not selected then click it to bring the list of mail accounts up. Select the account you would like to edit and click the "Properties" button.

A window like the one below will appear. There are several tabs but the only ones you will need to change are the "General" and "Servers" ones. Screenshots appear below for each of these tabs with information about what you may want to change.

The text box at the top is a reference name for this account and is what appears on the send and receive menu and in the accounts dialogue box (which appears in the screenshot above ¡V where you clicked the account and then the properties button).
Name ¡V this is the name that will appear in emails that are sent. You would enter your name here.
Organisation ¡V this is the name of your company. It will be added to email messages that are sent but not many email programs will actually show the organisation name.
Email Address ¡V this is the email address that will appear in the emails that are sent. You would enter your email address here.
Reply Address ¡V you can set a different reply address to the one that will show as the sender's email address. When the recipient replies to the email it will be sent to this address. You wouldn't normally set this to anything other than your email address (which you set in the email address field above it) so should either make this the same or leave it blank.
Include this account¡K - this should be ticked if you want Outlook Express to collect mail for this account when you click the "Send and Receive" button.
After making any changes click the "OK" button. If you need to make changes to the information on the other tabs then do those before clicking the "OK" button.

Incoming Mail¡V this will be set to the server that you collect mail from (known as a POP server). For webenz POP accounts it will be "jupiter.webenz.net". For other ISPs it will be one of the servernames listed in the table in the previous section.
Outgoing Mail ¡V this is the server that mail is sent through and should be set to your ISP's outgoing mail server (known as an SMTP server). See the list of servernames for your ISP's outgoing mail server in the table in the previous section.
Account Name ¡V this is the name of your POP account, which should have been provided to you by your ISP. It is usually the same as your internet access login name.
Password ¡V this is the password used to connect to the POP account. If the "Remember Password" box is not ticked then it will be greyed out and you will need to enter the password when you first collect mail each time you start Outlook Express up.
Log on using¡K & My Server requires¡K - these would normally be not ticked. You should only need to set these options up if advised by your ISP.
After making any changes click the "OK" button.
|

